Overview
Understanding LOD
LOD stands for Level Of Detail - a system used to represent distant objects with simplified meshes and textures to improve performance. In Bethesda games, LOD primarily refers to Cell LOD, which represents whole "chunks" of land in the distance.
Cell LOD is not based on distance - it's a binary state of whether cell is either loaded or not. The LOD Block distance settings control the max draw distance of LOD itself, not the point where it begins.
This means that you will see LOD pop-in at the same distance regardless of the settings.
Cell LOD is divided into three main categories:
- Object LOD - Simplified versions of buildings, rocks, and other static objects. Has only one quality level and generates relatively quickly.
- Terrain LOD - Represents the terrain of cell groups, with multiple quality levels that change based on distance (LOD4 4x4, LOD8 8x8, etc.). Takes the longest to generate due to its complexity.
Tree LOD is unused in Fallout 4, all trees are included in the Object LOD.
Why Generate Custom LOD?
The vanilla game's LOD is pre-generated and static, which means it can't reflect changes made by mods to terrain or objects. Custom LOD generation creates meshes that match your modded game, providing:
- Increased visual consistency between nearby and distant objects.
- More objects visible in the distance.
- LOD textures that match your installed texture mods.
- Improved quality over the low-detail vanilla LOD.
- Filled gaps where objects previously appeared out of nowhere during cell transitions.
The Midnight Ride (even with TMR Extended) does not strictly require terrain LOD regeneration, but this guide covers both object and terrain LOD to accommodate custom modlists.
While custom LOD significantly improves visual quality, it does come with a minor performance cost. The trade-off is generally worth it for most modern systems.
LOD Comparison
Drag the slider handle to compare how the game looks with generated LOD. Use the dropdown to select different comparison sets.
Preparation
Creating a Separator in MO2
- Right-click the empty space in the left pane of MO2 and select Create separator.
- Name the separator LOD.
Installing LOD Resources
Install in the following order:
-
FO4LODGen Resources
- Main Files - FO4LODGen Resources
- You will be prompted with a FOMOD installer:
- FO4LODGen.esp
- Install
-
HD LOD Textures
- Main Files - HD LOD Textures
- Optional Files - LOD Fixes and Additions
- After installing LOD Fixes and Additions, open the mod in Mod Organizer, and hide LOD Fixes and Additons.esp file.
- Open the mod in Mod Organizer 2 by double-clicking it on the left pane.
- Go to the Filetree tab.
- Right-click the file or folder you want to hide and click Hide.
How to hide files and folders:
-
ModernHouseLOD
- Main Files - ModernHouseLOD
-
Far Object LOD Improvement Project
- Main Files - Far Object LOD Improvement Project
- You will be prompted with a FOMOD installer:
- Next
- Next
- Install
-
Far Harbor 3D Tree LODs
- Main Files - Far Harbor 3D Tree LODs
- You will be prompted with a FOMOD installer:
- Next
- Install
-
Optimized Vanilla Tree LODs
- Main Files - Optimized Vanilla Tree LODs
- You will be prompted with a FOMOD installer:
- Next
- Enable all options with an asterisk appended, Next
- Enable all options with an asterisk appended, Next
- Enable all options with an asterisk appended, Install
-
Northern Foothills Rocks Fix
- Main Files - NF_Rocks_Fix_Packed
IMPORTANT:
Enable all resources in MO2 before continuing.
Pre-Generated LOD
If you use a TMRE modlist with no changes to textures or the game world, you can skip manual LOD generation by using this file. It includes both Object and Terrain LOD and was generated with Force LOD8 enabled.Simply install it as a normal mod in MO2 and put it under the resources listed in the previous section (which you still need), then move prp.esp to the bottom of your load order.
Generating LOD
FOLIP Before Generation
- Setup xEdit according to the ModdingLinked Setup instructions here.
- Launch xEdit with any plugin loaded, then go in the settings and disable Simple Records.
- Download FOLIP xEdit Scripts and drag the archive's contents into xEdit's Edit Scripts folder.
- Restart xEdit and load all of the plugins.
- Once everything has loaded, right-click any of them and Apply Script..., then select the FOLIP - Before Generation.pas file and click OK.
- Optionally, enable Force LOD8 for better visuals at a small performance cost.
- Click Start.
- When complete, you will see a message saying "Patch generated successfully!", click OK.
- Exit xEdit and save the plugin when prompted.
- An Explorer window should have opened showing the output file. Take it and drag it to the bottom of your LOD separator in your modlist to install it.
- Make sure the output's plugin is enabled in your load order.
TexGen
- Download the latest DynDOLOD 3 Alpha.
- Once the download has finished, extract the contents of the archive to any location of your choice (do not use a UAC protected folder or the game folder).
- In MO2, select the
 button at the top of MO2 to open the executables menu.
 - Click the + at the top of the window and the select Add from file...
- From the pop-up, navigate to where TexGen is installed and select TexGenx64.exe.
- In the Arguments box in the right pane, enter -FO4
- Select TexGen from the executables drop-down in the top right of MO2 and click Run.
- Once the program has loaded, make sure that Base Size is set to 256 (1440p). Higher resolutions are unsupported due to game engine mipmap bugs associated with exceeding the Object LOD atlas.
- Click Start.
- When complete, you will see a message saying "TexGen completed successfully", click Zip and Exit.
- Install the TexGen output by clicking the
 button at the top of MO2.
 - From the new window, navigate to the DynDOLOD folder you installed in step 2, then double-click TexGen_Output.zip and install it.
xLODGen
xLODGen is an xEdit-based tool that allows you to generate LOD meshes for your game. Similarly to xEdit, it has a single executable that can be be turned into a game specific version by adding arguments.
- Download the latest xLODGen from here.
- Once the download has finished, extract the contents of the archive anywhere outside of the default Windows folders.
- In MO2, select the
 button at the top of MO2 to open the executables menu.
 - Click the + at the top of the window and the select Add from file...
- From the pop-up, navigate to where xLODGen is installed and select xLODGenx64.exe.
- In the Arguments box in the right pane, enter -FO4 -O:"C:\Output"
- Select xLODGen from the executables drop-down in the top right of MO2 and click Run.
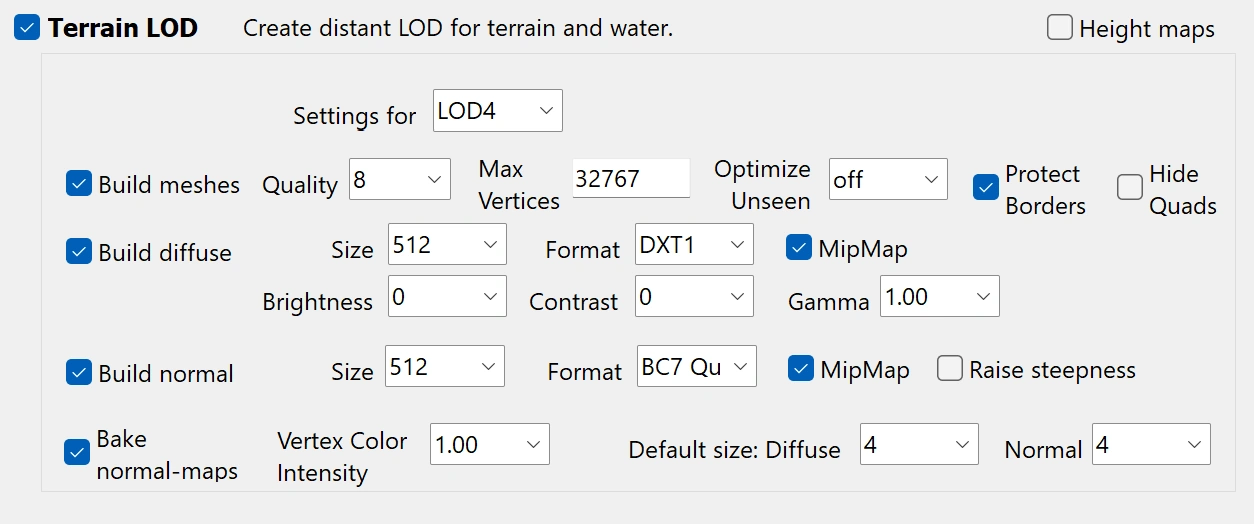
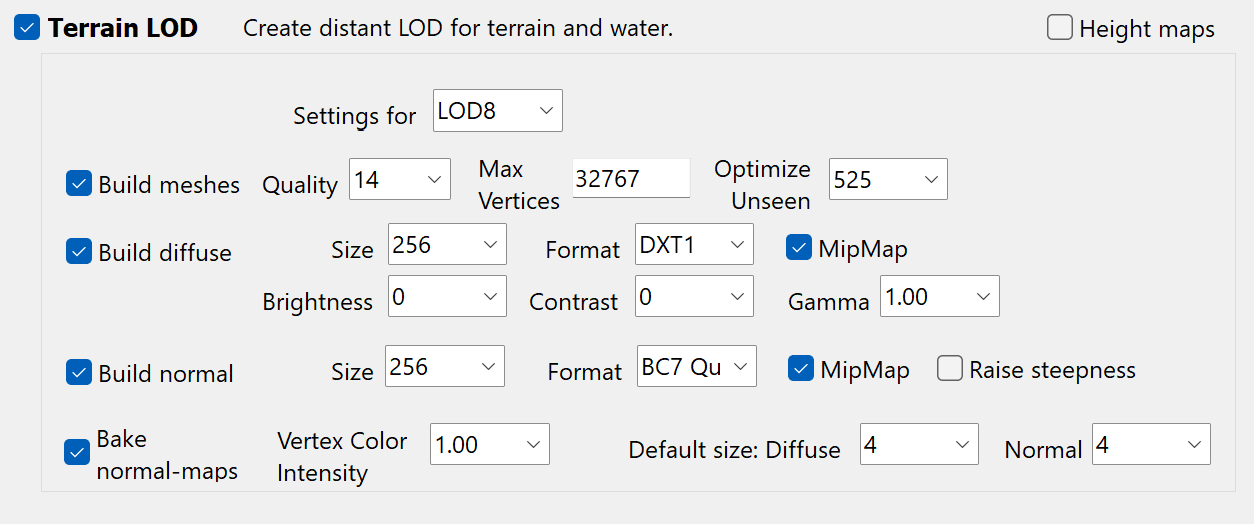
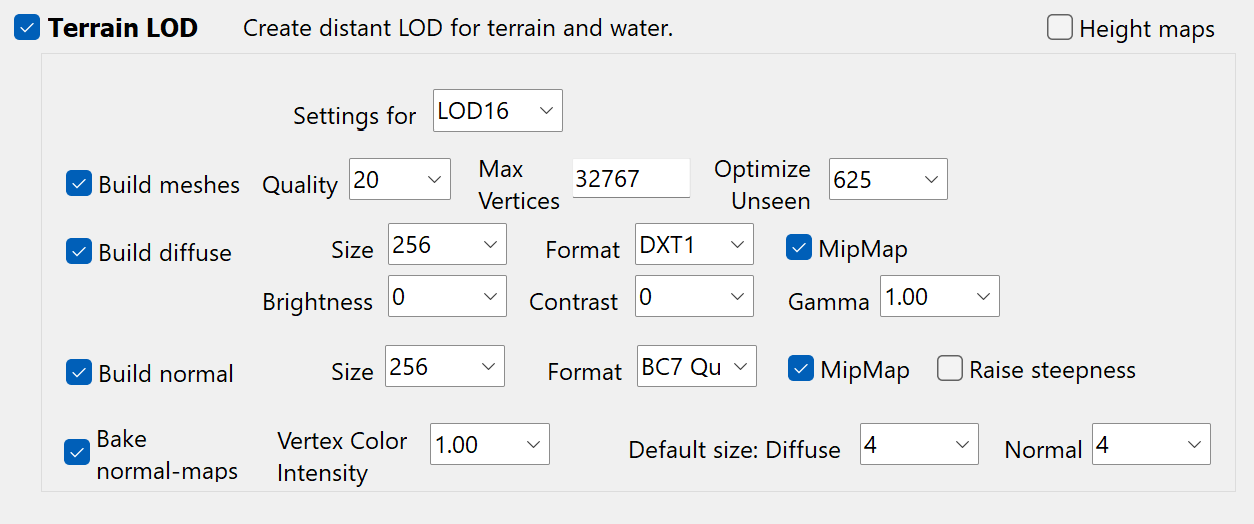
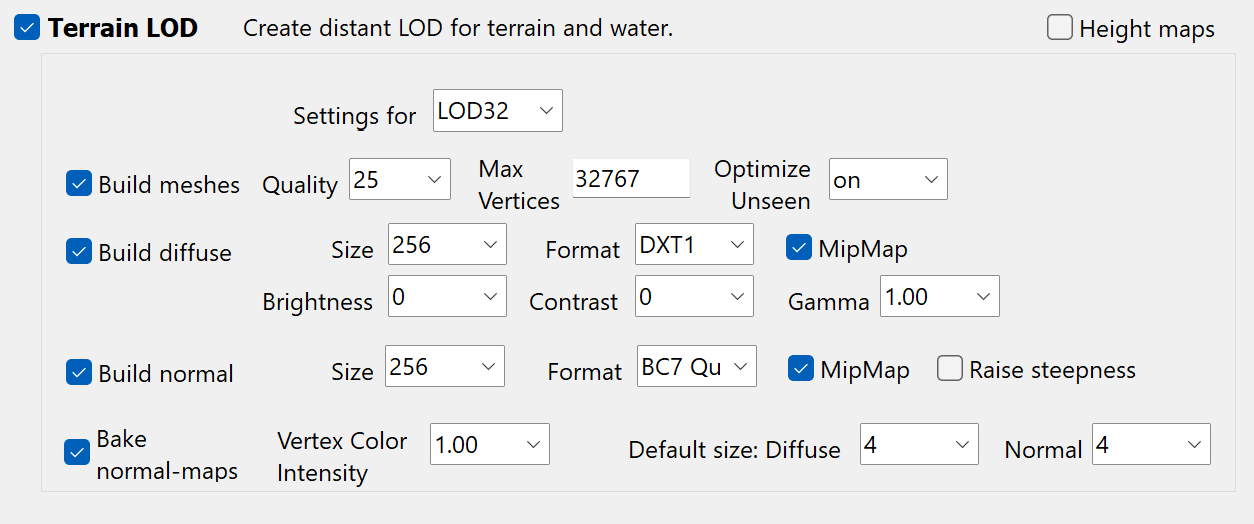
- Copy all settings from the image below:
- Click Generate.
- When complete, the log will stop and at the end you will see a message saying "LOD generation done", you can now close xLODGen.
This argument will send the LOD output to a folder called Output on your C drive (the drive Windows is installed on).
You can change this path if you would prefer the files to be generated elsewhere (do not use a UAC protected folder or the game folder).
Make sure that the output folder is empty before generating LOD.
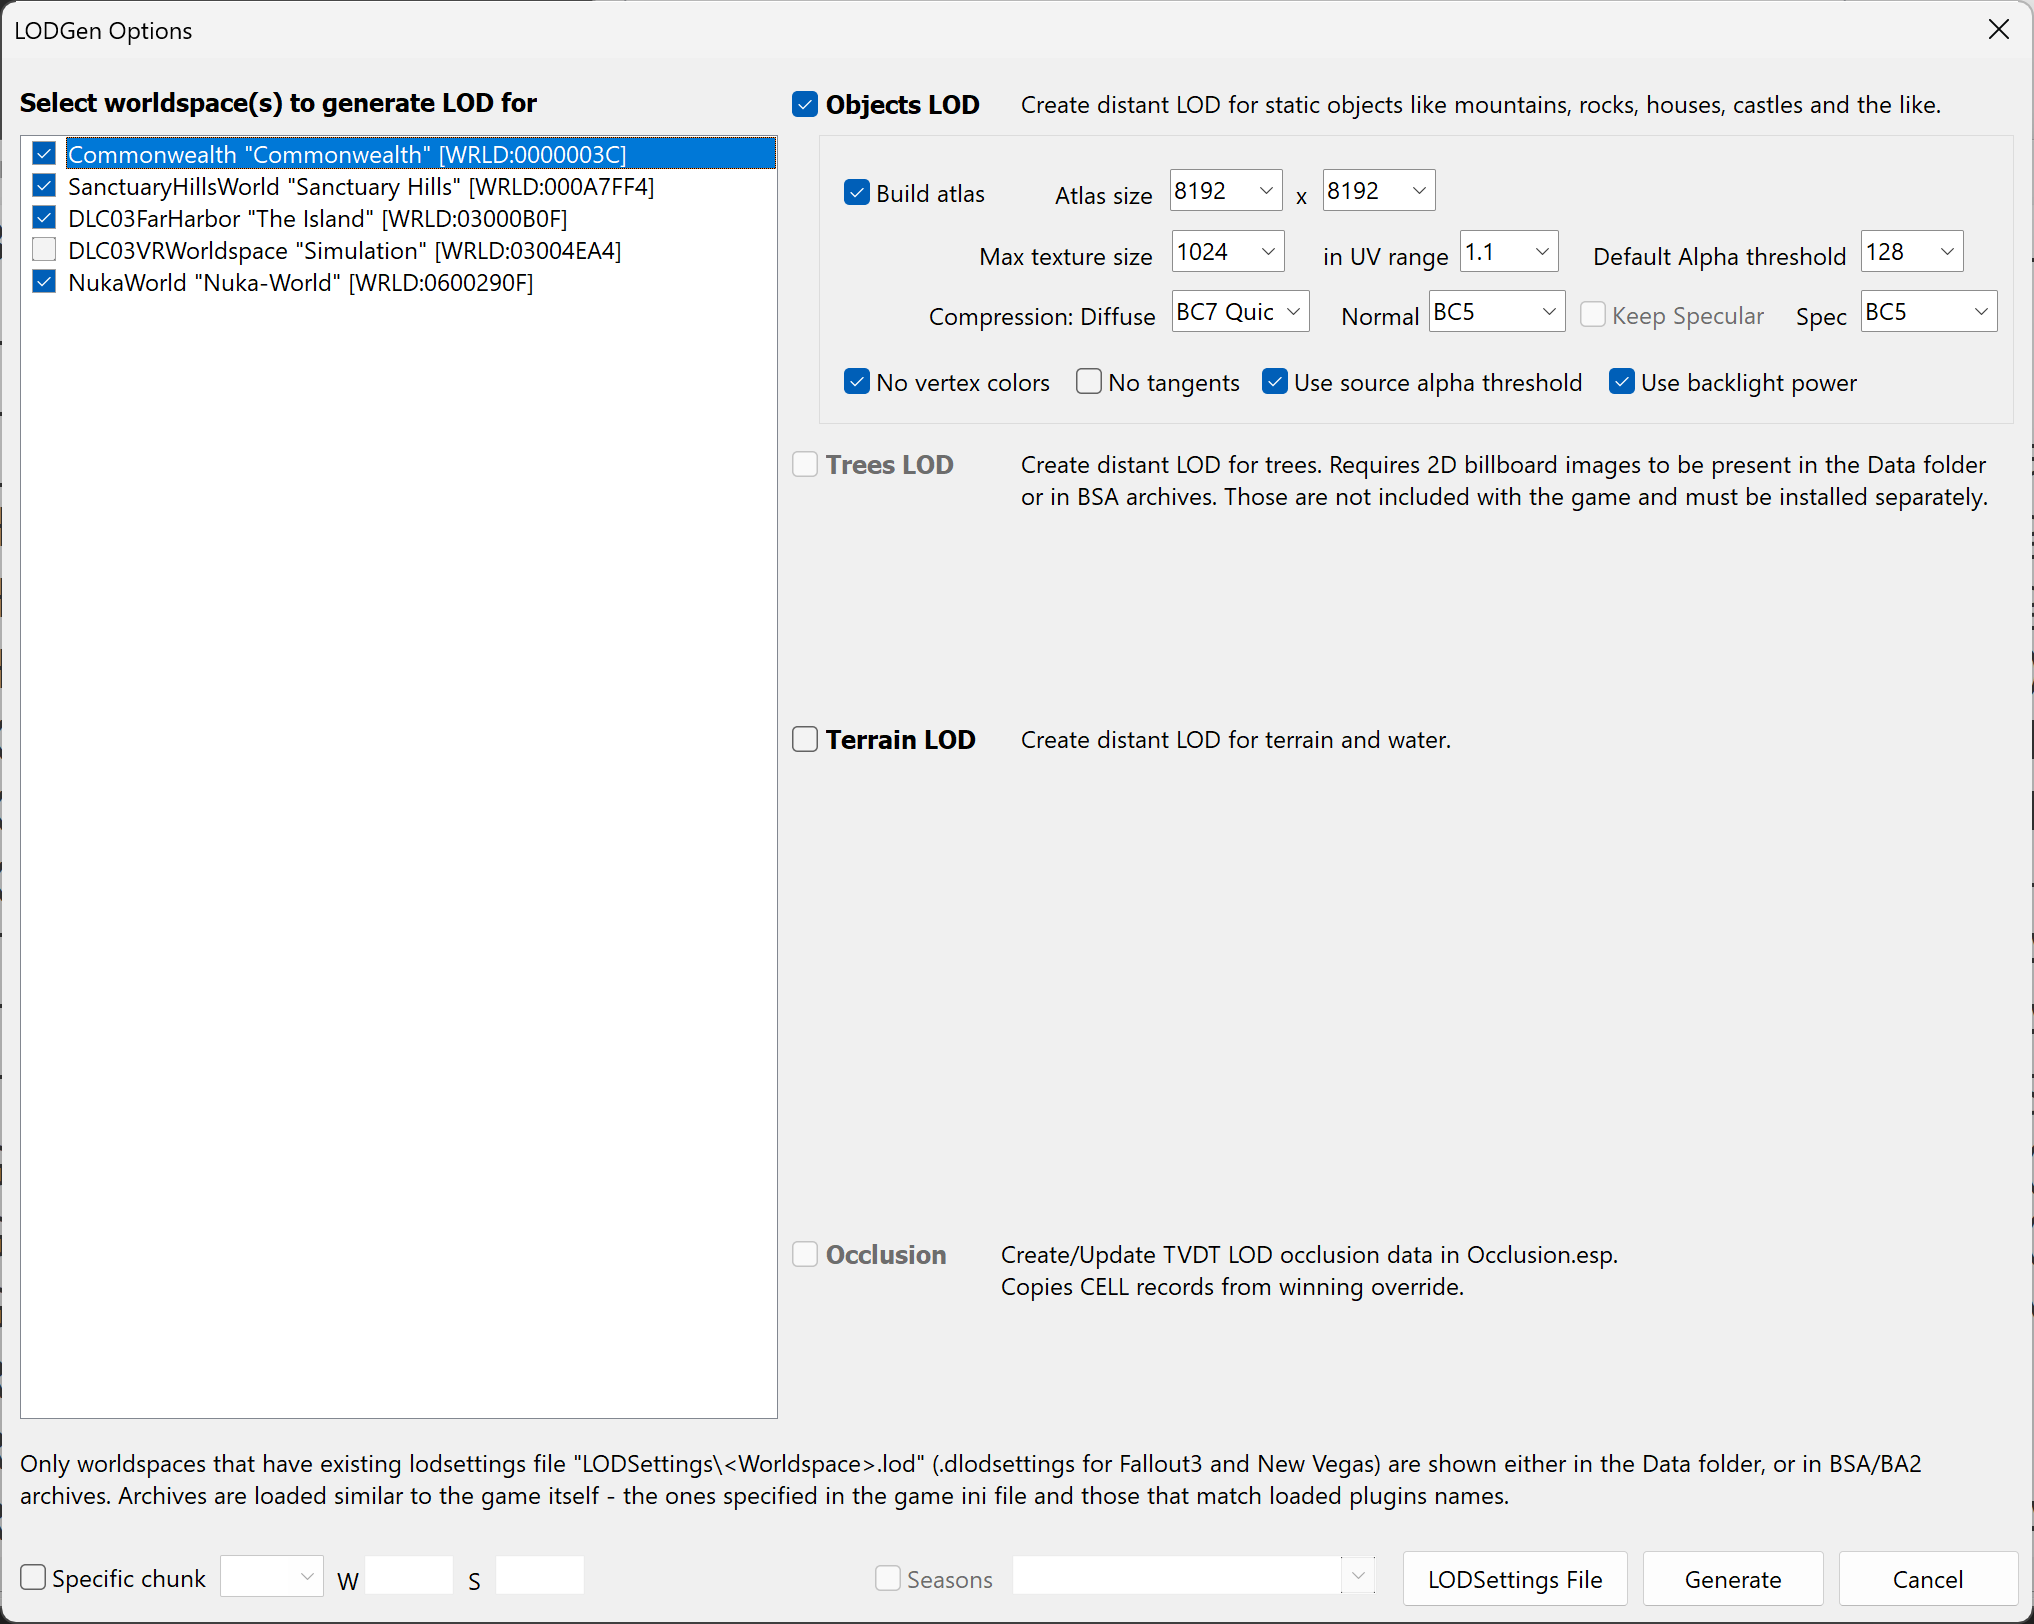
Generating LOD for the DLC03VRWorldspace is a waste of time and disk space as you won't be able to see any LOD in that location.
Installing the LOD
- In MO2, click the tiny wrench icon at the top, next to the mod counter, then click Create empty mod.
- Title the mod FO4LODGen Output.
- Navigate to where the LOD files were generated and select both the
texturesandmeshesfolders. - Cut them to the FO4LODGen Output mod you just created (right-click on the mod and select Open in Explorer).
- Press F5 while you are on MO2 without any menu open, then make sure the new mod is enabled by ticking its checkbox.
IMPORTANT:
Do not disable the LOD resources you installed previously, the game needs them for the LOD to work properly.
Generated LOD must always be loaded last in your modlist!
If it happens to be overwritten by any mod, the LOD in-game will be broken.
FOLIP After Generation
- Just like before, open xEdit and load all of the plugins.
- Once everything has loaded, right-click any of them and Apply Script..., then select the FOLIP - After Generation.pas file and click OK.
- Let the script finish then exit xEdit and save the plugin when prompted.
- In MO2, click the tiny wrench icon at the top, next to the mod counter, then click Create empty mod.
- Title the mod FOLIP - After Generation.
- Double-click Overwrite and drag FOLIP - After Generation.esp to the newly created mod, then enable it (both in the modlist and load order).


