

Preparation
Installing VC++ Redistributables
Most engine mods and tools require latest Visual C++ Redistributables to be installed. We will use an all-in-one package that will install all possible versions.
Failure to have latest versions installed will result in an immediate crash when launching the game or modding tools.
Please install the redistributables even if you have them installed already, as they are often outdated.
- Download VC++ AIO from TechPowerUp.
- Extract the archive and run the included install_all.bat as an administrator.
- Restart your PC.
Enabling File Extensions
Before we start, it is important to enable file extensions in Windows.
By default, File Explorer will not show file extensions (such as .exe, .dll, or .esp). These extensions are very important when going through the guide, so it is highly recommended to enable visible file extensions:
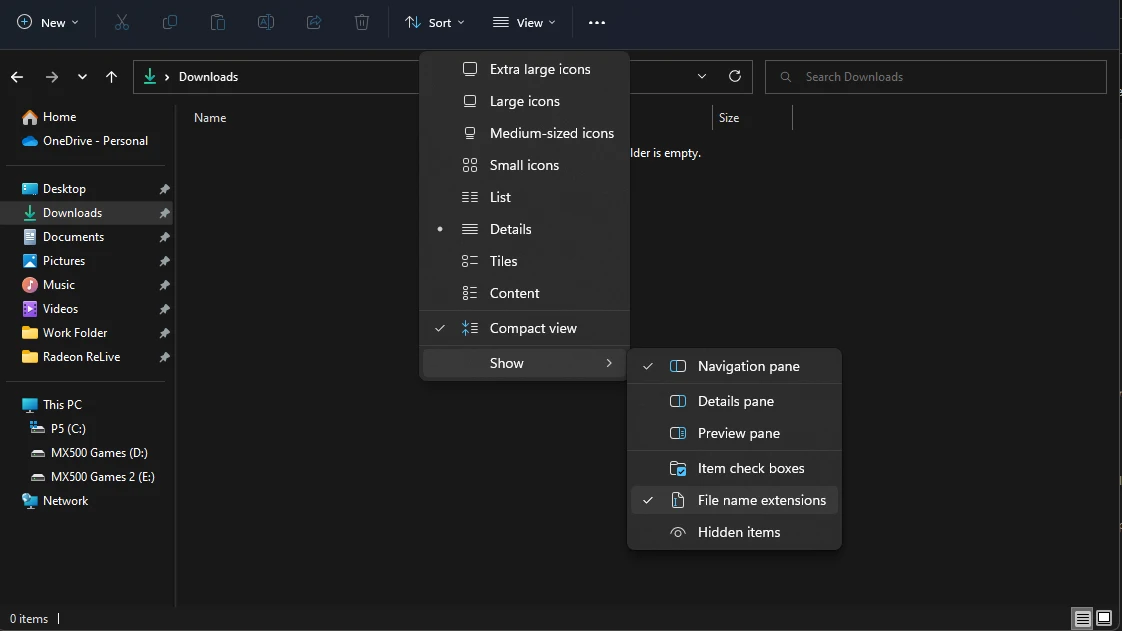
- Open File Explorer.
- Select the View tab at the top.
- Enable File name extensions in the Show section.
Installation
Choosing a Location
A clean installation is not only required to get rid of any potential leftover mod files, but also to make sure the game is installed in a safe location. Here is what you need to know when choosing where to install your game:
-
Avoid any default Windows folders: This includes but is not limited to C:\Program Files, C:\Program Files x86, your Desktop and your Documents folders.
This is because users lack write access to Program Files, while Desktop and Documents are often managed by OneDrive. This can cause many issues with the game and any modding tools.
An example of a safe location is C:\Games - Install on an SSD if possible: Having the game on an SSD will drastically improve loading times and decrease stuttering.
Uninstalling the Game
If you never installed the game before, go directly to the next section.
If you already uninstalled the game, make sure to follow step 4 and 5 to ensure there are no leftovers.
- Open Steam and go to your Library.
- Find Fallout 4 in the list.
- Right-click on it and select Manage -> Uninstall.
- Navigate to Steam\steamapps\common and, if present, delete the Fallout 4 folder.
- Navigate to Documents\My Games\Fallout 4 and delete all INI files inside it.
Creating a new Steam library
It is strongly recommended to install the games outside of any default Windows folders (such as Program Files (x86)), as the the strict Windows file protections of these folders can break certain mods/tools. Instead, we will use a tool called Steam Library Setup Tool to create a new Steam library folder outside of any default Windows folders.
If you already have Steam installed outside of any default windows folders then go directly to step 1 of the next section and install the games to your custom Steam library.
- Completely exit out of Steam using Task Manager or System Tray.
- Download the steam_library_setup_tool-3.2.exe file from here.
- Once downloaded, run the file and add a new entry by clicking Add Row.
- Type the chosen path under Path, e.g. C:\Games\Steam
- Click Accept then Yes if prompted to create a new folder.
- The tool will ask to exit, select OK.

Installing the Game
- Open Steam and go to your Library.
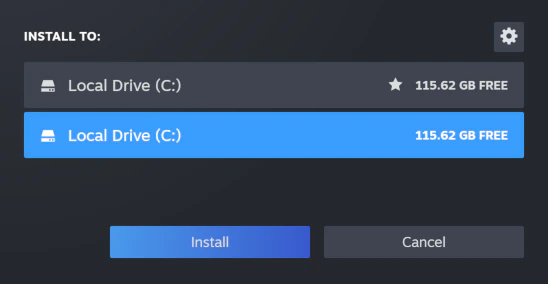
- Find Fallout 4 in the list and select Install.
- Under Install to:, select the library folder created with the tool, which is the second C:\ entry if you are installing on the main drive.
- Select Next then wait for the install to finish.
If you still do not see your new library, restart your PC.
Post-Installation
Key Terminology
Now that the game is installed, there are two folders from it that will be referred to in the guide often:
- Root folder: Where the game is installed.
Steam\steamapps\common\Fallout 4
- Data folder: Where all of the game's assets are located.
Steam\steamapps\common\Fallout 4\Data
Generating Fresh INI Files
- Run the game from Steam.
- Click OK to both pop-ups that say Detecting Video Hardware.
- If there aren't any pop-ups, navigate to Documents\My Games\Fallout 4 and delete all INI files, then retry.
- Click OK then Exit.
Fixing High DPI Scaling
- Right-click on Fallout4.exe in the Root folder.
- Open properties and navigate to the Compatibility tab.
- Click on Change high DPI settings.
- Set High DPI scaling override to Application.
Wabbajack Users!
You are done with the Introduction and Setup of the guide, go back to the Wabbajack page to continue installing the list with it!